The Ideal BJJ Fight Flow

Jiu Jitsu is more than a collection of submissions. It was designed to be a comprehensive fighting art. People new to the art often get confused with what they see as endless options. They know they want the fight on the ground, but they don’t think it matters how it gets there. They don't know if they should learn takedowns, wait to get taken down themselves, or just flop on their back and pull guard. This is unfortunate because there is absolutely a preferred strategy and ideal path for BJJ practitioners.
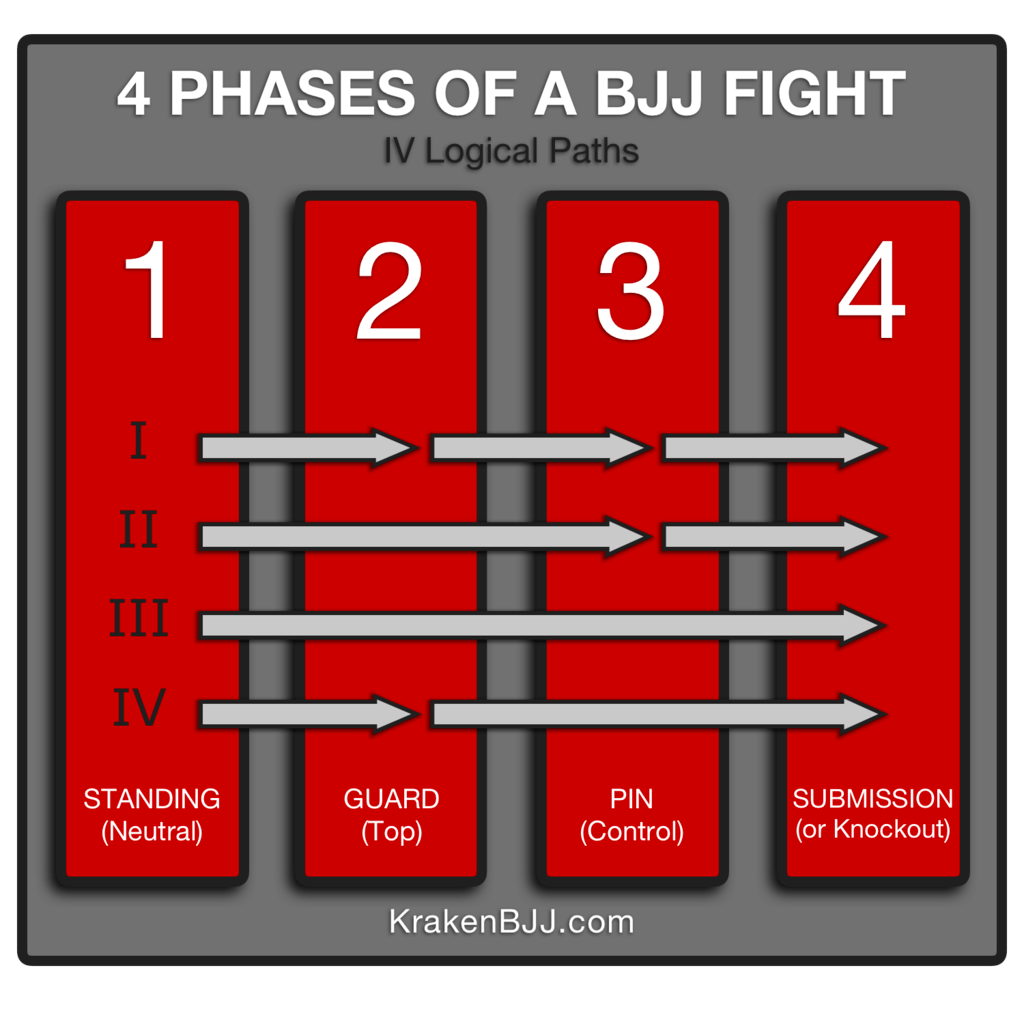
There are four phases in the ideal flow of a Jiu Jitsu fight - this is true in a sport BJJ, self-defense, or MMA context.
To move from one phase to the next, techniques are employed. Understanding these four phases and how to drive the fight from phase 1 to 4 is critical. I’ll detail these 4 phases next and then describe the 4 logical paths to get from phase 1 to phase 4
More...
Phase 1
Standing
Most conflicts start standing.
A Jiu Jitsu expert must be competent in the stand up department. He must understand how to use grips, defend takedowns, avoid punches, and execute takedowns.
Phase 2
Guard (top)
Once you take someone down, a competent opponent will attempt to use the guard to avoid being totally dominated.
A good Jiu Jitsu practitioner must be able to safely execute a guard pass to get to Phase 3.
Phase 3
Pins & Control
The best position for a Jiu Jitsu fighter to finally end a fight is in a pinning or control position.
Holding an opponent in a pin or control position minimizes the chances that they can hurt you and maximizes your ability to secure a submission or knock out.
Phase 4
Victory
We want every fight to end in victory.
Victory can look very different depending on the context - victory in a schoolyard scuffle will be very different than victory in hand-to-hand combat in a war zone.
Phase 1
A fight or a grappling match will generally always start from a standing position. That’s the way it is in every grappling sport, traditional martial art, or MMA fight. Standing is considered a neutral position. Neither person has the upper hand and they must use whatever technique they know to bring the fight to the ground.
Grapplers with a strong takedown game have a distinct advantage over those with a weak takedown game in a fight. The takedown artist is able to bring his opponent to the ground and into a dominant position. Therefore, every BJJ athlete needs to develop a takedown game. They need to be adept at a handful of takedowns and have excellent takedown defense.
Phase 2
When an athlete successfully takes his opponent down, he generally finds himself in some semblance of a guard. Open, half, and closed guards are all very common. This top position in an opponent’s guard is Phase 2.
A smart BJJ practitioner will begin his pass to side control immediately after securing the takedown. This is because hesitating inside the guard will usually make the pass much more difficult. The bottom man will quickly gain strong grips, establish a strong guard, and attempt to sweep or stand back up. The top athlete needs to employ a pass as soon as possible to make the process as easy as possible. The guard pass is the technique we use to get into the next phase.
Phase 3
This is the phase where the most damage can be inflicted. Phase 3 is where the top man effectively pins or puts the down man into a control position. There are multiple options to pin and control – side mount, knee-on-belly, mount, back mount are all popular options.
Phase 3 is the first phase where the top man can step off the accelerator for a moment if he needs to – the down man is under control and can’t easily cause the top man any damage. But why slow down here? There are a few scenarios where it would be appropriate. First, the down man may be sufficiently large and strong that you will need to wear him down before you can submit him. Second, in a less than serious altercation (think about dealing with an inebriated person) this may be the appropriate time to deescalate the altercation. These are just a few reasons and there are probably more.
Even though I previously stated that you can possibly step off the accelerator in phase 3, that does not mean that you take it easy on the bottom man. Pinning and control positions are all about exerting large amounts of pressure and discomfort on the bottom man. He should feel trapped and miserable. Your pressure should drive him to either quit or to seek relief by making a position mistake. It’s common for the bottom man to put a limb in peril or turn his back to the top man to relieve pressure. This is the best time for the top man to advance position or lock in a submission.
Submissions are not the only technique available in phase 3. Jiu Jitsu is a fighting art, after all, so in a fight it is definitely appropriate to strike. Ideally, strikes and submissions should flow seamlessly. Thousands of MMA fights have proven how effective strikes are at setting up a submission. It’s also possible that the strikes themselves will end the fight, either trough submission or loss of consciousness.
Phase 4
Submissions and strikes are the techniques that bring us to phase 4 – victory. Getting to this phase is the number one goal of this martial art. And, we want to get there as fast as possible while minimize damage to ourselves.
Victory looks different depending on the situation your in. Therefore, the techniques you employ should be appropriate for whatever that situation is. Jiu Jitsu can be used on the playground, in a BJJ academy, on the streets, in a cage, or even on a battlefield. Victory in one scenario may be getting an opponent to tap out, in another scenario it’s the incapacitation of the opponent. This martial art has techniques appropriate for every scenario.
Four Logical Paths through the 4 Phases
There are 4 phases to the ideal BJJ fight and there are also four logical paths through those phases. It’s important to be prepared to go through each phase, but sometimes your able by pass a phase or two. Let’s explore the four logical paths next, starting with the first and most logical path.
Path One
This is the most logical path. This is the option you see most when the opponent has any idea what they’re doing in a fight. It looks like this. A takedown is executed and the bottom man scrambles for a guard. The top man quickly begins executing a pass and he ends up in top side control. He may strike or submit the bottom man from here or he may transition to a mount position (top or back) where he will then finish the fight. This is classic Jiu Jitsu. This is what we all strive for. This is also the logical path that the IBJJF (international Brazilian Jiu Jitsu Federation) endorses. You can tell this is true by observing the point system under IBJJF rules. Two points are awarded for the takedown, three points for the pass, and four points for the mount. And, the match is instantly won with a submission. As you can see, the athlete is progressively rewarded more and more for using techniques to take the fight from phase 1 to phase 4.
Path Two
Path two is like path one, except the takedown results in a pinning or control position; phase 2 is skipped. This is the second most common path. Certain takedowns land the aggressor in phase 3. Some examples include a double leg or seoi nage that lands in side control, an arm drag back take, or a firemen’s carry. All these techniques (and many more) totally bypass phase 2. Progression from phase 3 to 4 are the same as before.
Path Three
This path takes a direct route from phase 1 to phase 4. There are several ways to do this. The guillotine is probably the most common standing submission but there are several others. Wristlocks, cross collar chokes, or strikes are all techniques that can be used to skip from phase 1 to phase 4. This path is number 3 because it does little to mitigate the offense of the opponent. Every second the opponent is standing in a neutral position, they are able to effectively use all their size, strength, and athleticism. That is why we prefer to get the fight to the ground as soon as possible so we can mitigate our opponent’s possible offense.
Path Four
Last, and least, is path number four. This path starts with a takedown and then goes directly to phase 4. Here are a couple ways this path can play out. First, after scoring a takedown the top man is in the bottom man’s guard. Instead of passing, he uses submissions or strikes to finish the fight. Second, after taking the opponent down, the top man sits back for a leg lock.
Path four is like path three because both paths involve more risk than path one and two. Applying submissions from within your opponent’s guard is frowned upon in most cases. Why? Because the vast majority of submissions are better performed from a control position. And also, because you’re still in danger of a submission or a sweep when inside your opponent’s guard. Therefore, path four is the least preferred.
Conclusion
4 Phases. Four logical paths through those phases. These phases and the paths through them are the best way to mitigate your opponent’s size, strength, and athleticism. This results in lower risk of personal harm and a greater probability of a positive outcome for you.

